
As an Android smartphone user, you might have heard about this application known as Google Camera or Gcam at least once.
Most tech YouTubers are seen uttering this term in their smartphone unboxing videos but what exactly is this?
Google Camera is Google’s camera application which they reserved for their Pixel devices only.
The default camera app that’s in your smartphone is either a brand-specific app or the bare minimal default Android camera app.
Well, thanks to the third-party developers around the world who tweak the Gcam to make it work on other Android devices.
Though the official app (Google Camera) is available on the play store, neither is it as feature-rich as the Pixel Gcam app nor won’t work with every device e.g. the OnePlus 7T we have in the house isn’t compatible.
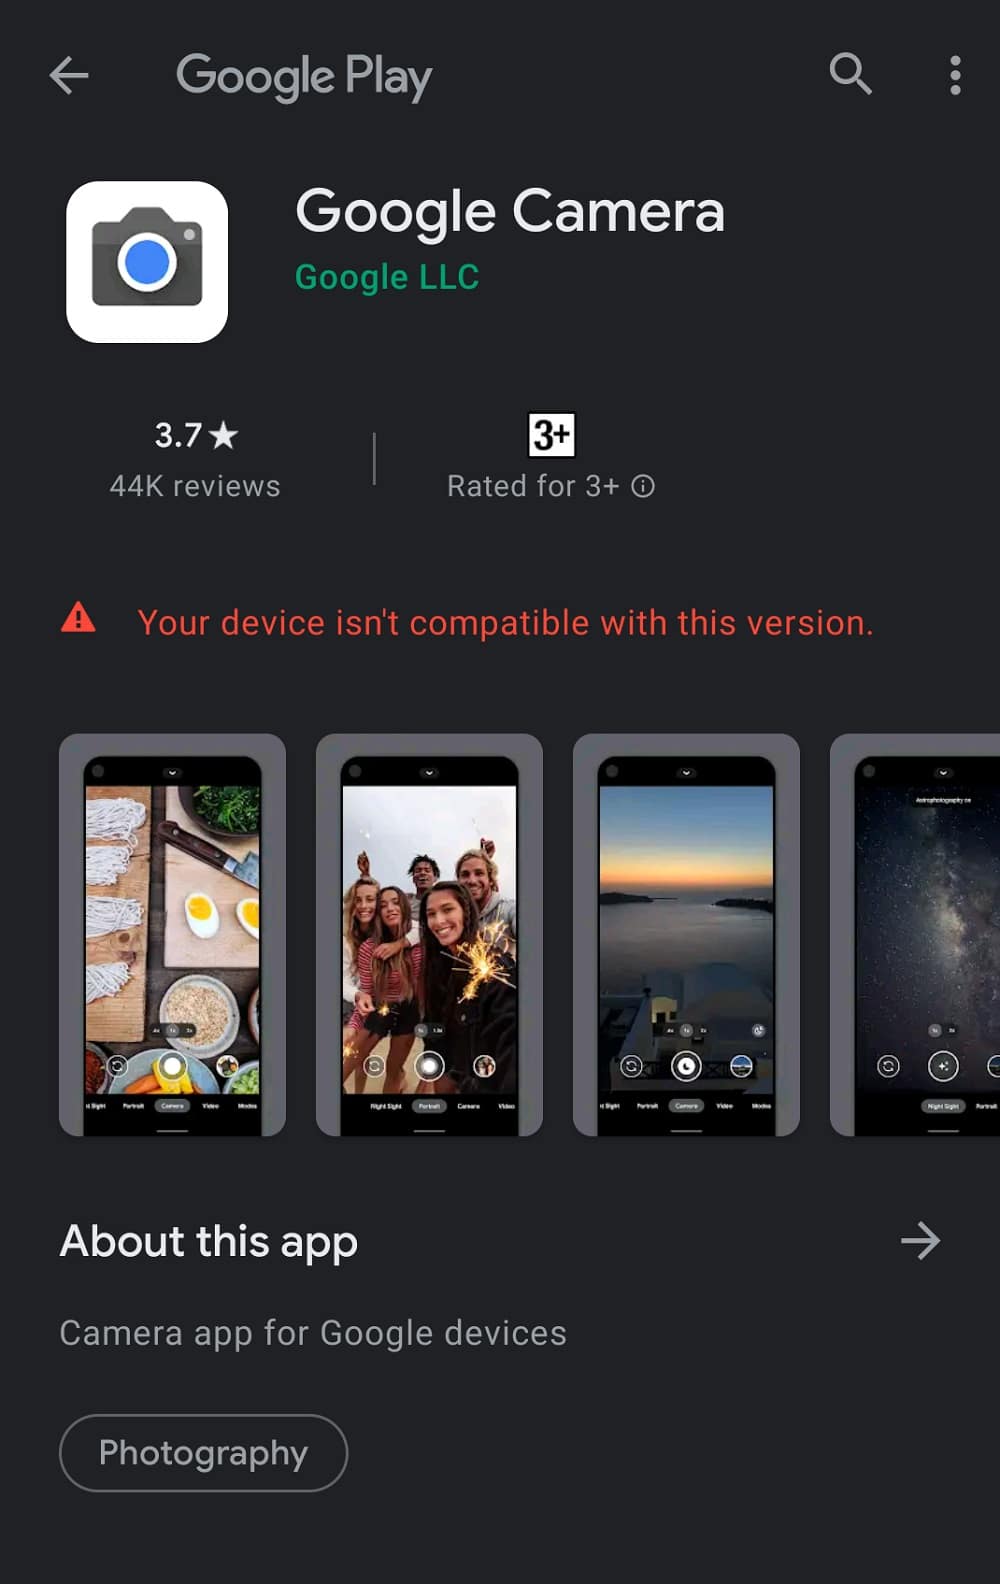
To check if your device is compatible or not, just type “Google Camera” in the Play Store search box and check it for your device.
Well – Well – Well, it’s not like it’s the only way to get Google Camera, but before we explain to you how to install Google Camera on your device let us give you the brief why you need the Gcam and how it is different from your regular smartphone camera application.
What is Gcam?
Gcam known as Google Camera is a basic camera application developed by Google but is limited to Pixel devices powered by Google’s proprietary software algorithms to make the pictures look the best in terms of sharpness, colour accuracy and details.
Why Google camera is better than your current camera
Google is one of the world’s best technology companies that has talented developers in the house who constantly improve their machine learning algorithms to make everything from searches to maps more precise and accurate.
The technology behind the Gcam is computational photography – it is a machine learning technique that improves the image quality, colours, details, and sharpness digitally.
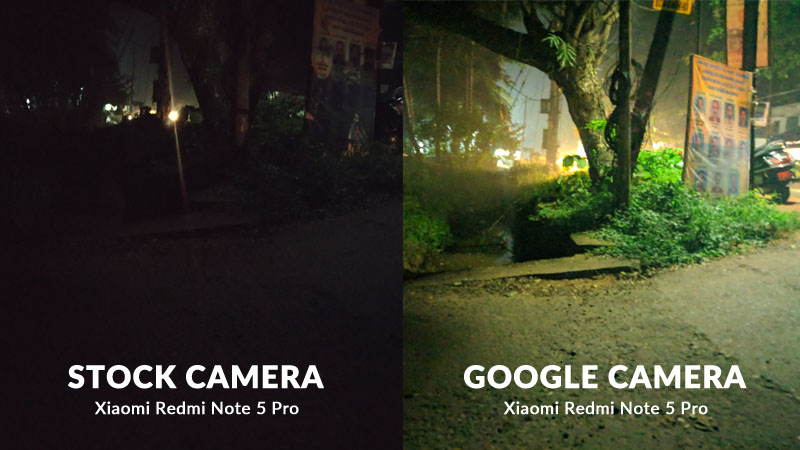
Here is an example of the image results from an old Xiaomi Redmi Note 5 Pro camera. The left image is taken from the default camera app which comes pre-installed and the right image is captured using Google Camera.
Looking at both the pictures, it is quite evident that the Google Camera is far better at processing images than the built-in app, especially in low light conditions.
To summarize, GCam can improve the budget smartphone camera quality significantly.
How to install GCam on any Android smartphone?
As we said, the Google Camera is limited to Pixel devices.
However, getting one is not that difficult if you know the correct method which we are going to explain here.
Before that, there is one requirement in a smartphone that is compulsory. Your device must have support for Camera2 API.
Checking the “Camera2 API” compatibility
To check whether Camera2 API is enabled or not, install this application “Manual Camera Compatibility” app from the Google Play store.
Follow these steps after you downloaded this recommended application:
- Open the application – It will ask for a few permissions and allow them all.
- Hit the “Start” button.
- If you see green checkmarks then your device has support for Camera2 API.
- If you see red checkmarks then your device does not support Camera2 API.
You can also check support for “Camera2 API” by using this application called “Gcamator”.
This application is way simple, just open it and it will show you whether your smartphone has the support of Camera2 API or not.
Even if your device does not have the support of Camera2 API, don’t worry. There are methods to get this as well. Read along to find out how.
For those who do not have support for Camera2 API
So you’ve tried checking in both the application we recommended and your device does support Camera2 API.
Follow the steps to get a solution:
Caution: The following method covers the procedure of “root” which also voids the smartphone warranty. Do it at your own risk and Bettershark Team will not be responsible in case of any data loss or any other damage to your smartphone.
We do have methods that allow you to enable Camera2 API without enabling root, the catch is it only works with several models so applying root makes the process easier for everyone.
How to enable Camera2 API: (Root is required)
This method requires a laptop or desktop computer also, you need to unlock the bootloader⚠️. It is necessary to enable the bootloader to make this method work from the smartphone settings, and unlocking it may differ from device to device.
Before diving into steps go to TWRP and find your device and download the appropriate TWRP file for your device and save it on your laptop or desktop computer.
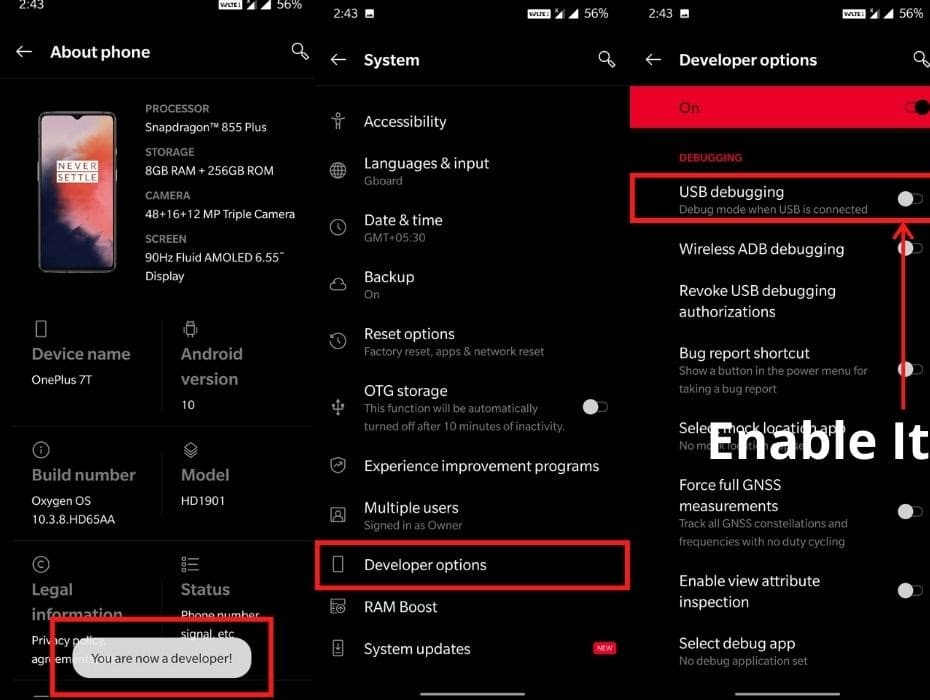
Step:1 – Smartphone settings
You need to enable developer mode and enabling it is very easy. Just head over to your device setting > About phone > Tap on “Build Number” 5 to 7 times and the option will be available in settings.
Step:2 – Download below software and files
You will require two software:
Step:3 – Enabling the fast boot mode on the device
To go into the fastboot mode, you need to switch off the device and need to press the – power button + volume down key if it didn’t appear then try pressing the power button + volume up key

The image of the fastboot mode might vary from device to device so don’t worry if your fast boot mode does not look as you see in this photo.
When your smartphone boots into fastboot, leave your smartphone as it is and connect your smartphone to a laptop or PC using a USB cable (Use the USB2.0 port of a laptop if possible as in USB 3.0 you might get multiple errors).
Step:4 – PC is in the action
We asked you to download two files on your PC, follow the instructions carefully to get this procedure done in one shot.
- Unzip the “Minimal ADB” (it will be named as platform tools so, don’t get confused)
- After unzipping that file, copy the unzipped folder and paste it into the C-drive.
- Take your TWRP file and copy it into the platform-tools folder (The folder you just moved to C-drive).
- From the folder (Platform-tools) run the file named “ADB.exe” as an administrator (Right-click on that file and you will see the “Run as administrator” option in the second row)
- Now a window will appear which looks like this (prefer the below image).
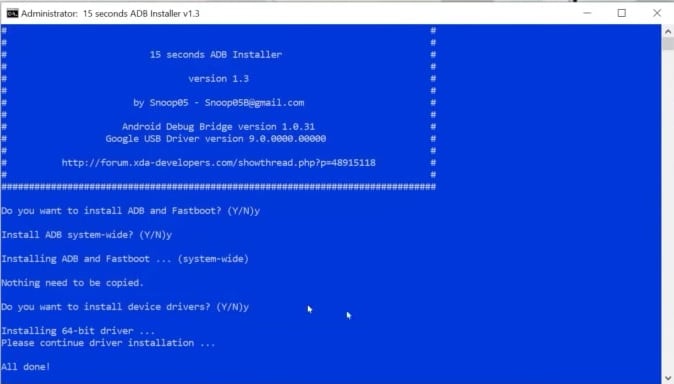
- When this window appears, enter “Y” at the end of the sentence and once all the procedures in this tab will be finished it will turn off automatically.
Now, head over to the C-drive and open the platform-tools folder, and type cmd in the file location bar, and hit the Enter button. A window in the black or blue colour will appear(refer to this image for better understanding).

Once you open this “Command Window” (CMD) you will see this – C:/platform-tools>
In continuation of this type of command: fastboot devices, you can simply copy and paste this text to cmd.
Hit the Enter button and you will see a serial number right below that command.
After that you will see the C:/platform-tools> again, now we are going to install the recovery into the device and do that type – fastboot flash recovery (TWRP file here).
To attach the TWRP file just click on the TWRP file and from the search bar copy its entire location and the final command will look like this:
E.g. C:/platform-tools>fastboot flash recovery C:/platform-tools>twrp-x-file-name.img
Hit the Enter and it will hardly take 15 seconds to install the recovery.
Step:5 – Successfully install the TWRP
Now unplug the USB cable from your mobile device and press the – Volume Up + Power Button, and if it’s not showing, try pressing Volume Down + Power button.
Showing recovery mode will take a few seconds to press the button until your device shows the company’s logo.
Congratulations, you’ve successfully installed the TWRP and now it’s time to root your device.
XDA-developer has explained in simple steps how to Root your device? After you are done, follow the instructions provided below.
Enabling Camera2 API
After rooting your device, restart your smartphone and download this application “BuildProp Editor”.
This file will allow you to edit the build.prop file which is available in your smartphone root directory > system.
Steps to follow:
- Open the application and click on the search bar
- Just type persist and it will show either 1 or 2 results with a value of 0 (Zero).
Those results will be as following:
- persist.camera.HAL3.enabled=0
- persist.vendor.camera.HAL3.enabled=0
Like we said you either see one or two, if two results appear in results change the Value (0) to (1). If only one result appears then it’s completely fine just change the value to 1.
In the application, at the top right corner, there are three dots. Click on it and tap on “Reboot”.
Now go to the “Manual Camera Compatibility” app and test again, they are all green meaning you have successfully enabled the Camera2 API. Now you can install a suitable Gcam application from this website and enjoy pro-level photography.
In any case, if you don’t find your device, try using the Gcamator app. The application we recommended at the beginning of the tutorial will detect your device and provide a suitable Gcam application that you can download directly into your smartphone.
If you still don’t find Gcam for your smartphone then you can search for their latest version on Google and try a few of the versions and see which one is more suitable for your smartphone.
Another method to enable Camera2 API
This method won’t work for all devices but is much more suitable for Xiaomi smartphones. In this tutorial you don’t have to Root your mobile phone, just install the TWRP and follow the steps given below.
Step:1 – Download Orange Fox recovery
Open this link and find if your device is there or not. If you find your device then download the Orange Fox recovery and save it into your smartphone.
Make sure you unzip the Orange Fox recovery file because the .img file is what you need in the process.
Step:2 – Flashing Orange Fox recovery
Now turn your device off and enable the TWRP mode by pressing the volume up + power button or the volume down + power button.
- After going into TWRP mode
- Click on the “Install” button
- In the bottom right corner, there is a button named “Install Image” click on it
- Now find the extracted Orange Fox recovery file
- Open the folder and look for the “Recovery.img” file
- A window will appear when you tap on the file and from there choose “Recovery” option
- You will see a slider on the screen just draw it to the right to install the recovery
Very important: Don’t just click on reboot after the process is done.
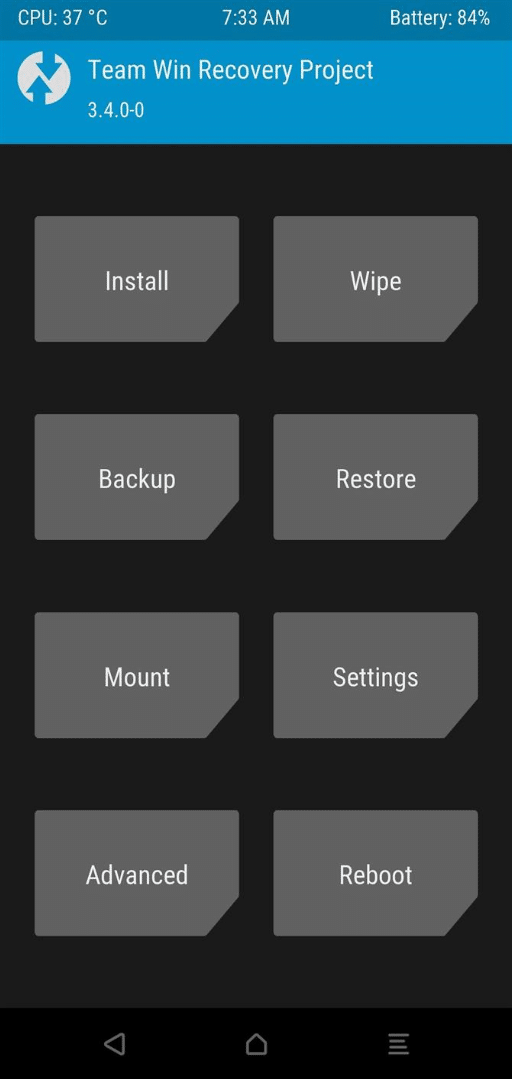
- Go back to the main TWRP menu, the main menu will look like the image given in Step:5
- From there click on the Reboot button given at the bottom
- Then again 4 option will appear and click on “Recovery”
Alright, you have now successfully installed the Orange Fox recovery. You don’t have to do anything; the device will automatically show you Orange Fox recovery.
Enabling the Camera2 API using Orange Fox
In the Orange Fox, recovery mode follows this instruction to enable Camera2 API.
- Click on the Menu button
- Select Mount button
- Select System and go back
- Search for the System folder
- Find build.prop file in the System folder
- Long press on the file and copy it
- Now paste this build.prop file into another folder (Another folder in internal storage or in MicroSD card)
- At last, click on the reboot system
After rebooting the smartphone you need to go to the file manager of your smartphone and follow the instructions.
- Find the copied build.prop file
- Open it with any text editor – you can find the text editor app in the play store
- In text editor look for this two-line
persist.camera.HAL3.enabled=0
persist.vendor.camera.HAL3.enabled=0
It might take some time to find but if you don’t find it you can add it manually. If you find it simply replace the value (0) with (1).
And if you don’t find it copy/paste the blow lines:
persist.camera.HAL3.enabled=1
persist.vendor.camera.HAL3.enabled=1
Now save the text file and exit.
Go back into the Recovery mode
We are almost done here so follow these steps carefully. Enable the Orange Fox recovery mode and follow the instructions.
- Click on the Menu button
- Select Mount button
- Select System and go back
- Now find the build.prop (the file you’ve just edited)
- Long press on the file and copy it to the system folder
- Reboot the system
Open the “manual camera compatibility” application and run the test to check if Camera2API is enabled or not, in most cases you will see green tick marks.
Now you can search the internet for GCam ports that suit your device or check this website to see if someone has ported the application to work with your smartphone.
Conclusion
That’s it for the short tutorial on how to install GCam on your smartphone.If you have anything in mind regarding the article do let us know in the comments section we are happy to help with your questions.
Thank you for being here, have a great day ahead!
Hi, would this work on Nokia 4.2?
Hi David!
You may try out this Gcam version for the Nokia 4.2. Some of the users have reported most of the standard functions working flawlessly.